This is a resource guide for sharing SuperCollider audio in Zoom or other video conferences.
It has been posted in a wiki format, which means it is community editable. With that in mind:
- If you have questions or comments on the topic, please post them as a reply.
- If you have new information or clarifications, please modify the original post.
- As questions are answered in the replies, lets incorporate them into the original post.
- Keep information concise and helpful, and prioritize linking to more extensive guides, over re-writing or copy-pasting.
General Information
On all platforms, sharing SuperCollider in a video conference requires a similar setup:
- Microphone audio and SuperCollider’s audio must be routed to the same audio device, so you can both speak and play SC sounds.
- In order to avoid feedback, you must EITHER:
- use headphones, or
- setup your routing so that SuperCollider and the meeting audio plays to your speakers, but your microphone audio does not.
- To avoid more complex routing setups, consider joining with a phone/tablet (for voice) and your computer (for SC audio).
- If you plan to share audio, make sure to test on a private conference beforehand, to make sure both your microphone and SuperCollider can be heard.
Platforms
Mac
Audio routing solutions
- Blackhole (free, GPL, simple setup)
- Jack (free, GPL, powerful, requires command line)
- Loopback ($100, powerful, easy GUI setup)
Blackhole setup
- Follow this guide to create a basic Blackhole routing setup for sharing in a conference, by adding SuperCollider as a source in the left-hand column.
- In the section “But it Doesn’t Detect My Microphone/Voice! What to do?”, you will need to setup SuperCollider to play your microphone audio out.
- Boot your sc server with your microphone as an input, by either setting it as your input device in Sound Preferences, or setting it using the ServerOptions object.
- This code snippet will give you a simple GUI for playing/stopping microphone input and controlling the volume:
Ndef(\microphone, { SoundIn.ar(0) }).gui; - Developer builds of SuperCollider may not have entitlements required to access the microphone. Official notarized SC builds should work correctly. If you’re not sure, test beforehand and when in doubt plan to share from an official build.
Loopback setup
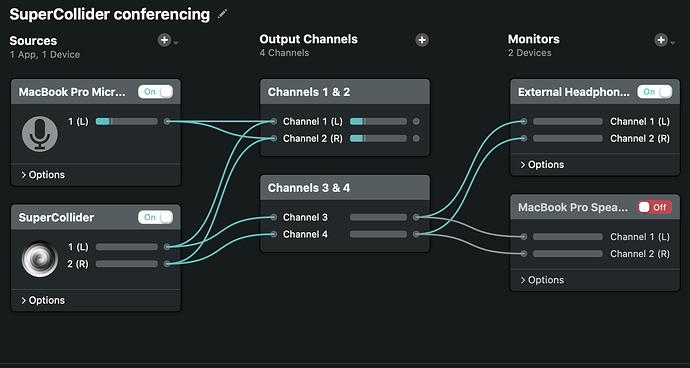
- Once Loopback is installed, you can route your audio after the SuperCollider server is booted.
- The above screenshot shows a simple routing setup for SuperCollider. Specifically:
- The first set of output channels (1 & 2) has both the microphone and SuperCollider audio. This audio will be consumed by your video conferencing application.
- The second set of ourput channels (3 & 4) has only SuperCollider audio. This audio can be monitored using headphones or speakers. This will allow you to hear your SuperCollider audio without generating feedback with your microphone.
Windows
Linux
Audio routing solutions
- Jack (free, GPL, powerful, command line or GUI front-ends)
Video Conferencing Solutions
Zoom
- Sound on Sound provides a good guide to getting high quality audio in meetings.
